Showing posts with label sewing. Show all posts

Friday, March 21, 2014

Custom Made Flower Girl Dresses - Michigan Wolverine colors

I had the pleasure to create these three lil dresses for my dear friend's wedding,  which happened to be themed with football team, Michigan Wolverines. If you have been following me blog then you know that I can sew but this was my first attempt at sewing dresses, and three to boot! Nothing too fancy, just sweet and simple. What do you think?

Saturday, December 7, 2013

Handmade Aprons For Sale! Just in time for the holidays!

With the holidays comes parties, family gatherings, and social get togethers...and that all usually has one thing in common: food! Rock you holiday baking and cooking in style with any of these aprons sure to make you the spotlight in the kithen!

Know of a baker that you still are looking for the perfect gift for? Why not a one-of-a-kind apron for Christmas? They are sure to love it all year long.

Email me with your request, below aprons are first come, first serve.

Sunshine Wine Reversable Apron - $50

Orange Blossom Reversable Apron - $50

Zebra Reversable Apron - $50

Secret Garden Apron - $45

 Pink Floral Apron - $45

 School Uniform Apron - $40


Saturday, April 24, 2010

Recycle a t-shirt into a tank top

So I was bored, and wanted a new shirt...and have been wanting to do an upcycle project for a while. So I dug around the closets and found this over sized t-shirt and went to work.
Here's the before and after products:
Before-
After-
Here are the instructions in case you would like to try it out yourself:
Step 1: Pick a t-shirt you don't mind experimenting with.
Step 2: Cut off sleeves and shoulders just under the neck line (save the sleeves for later):
Step 3: Trim the sides at an angle starting from bottom and cutting upwards to the corner to the shoulder. Repeat to the other side. This will create a slight flare with the bottom of the shirt being a little larger than the top of the shirt:
Step 4: With right sides facing each other, sew a seam along each side using the zigzag stitch on your sewing machine due to this is stretchy material:
Step 5: With right sides still facing each other, iron down flaps on both sides to prevent rolling:
Step 6: With shirt still inside out, fold flap on top of shirt down about an inch and sew using zigzag stitch. Be sure to leave enough room to run elastic through the inside. Sew all the way around except for about the last inch which will be used to insert the elastic:
Step 7: Measure the distance in inches around your chest above the breast. Reduce this number by about 2 inches and cut the length in elastic. Attach a safety pin to one end of the elastic. Slide the safety pin through the path created in step 6 until all the way through but be sure to hold onto both ends on each side:
Step 8: Hand sew the each end of the elastic to each other to form a complete circle and then sew the gap in the seam of the shirt.
Step 9: Using one of the sleeves of the shirt cut off the seam:
Step 10: Cut along the bottom seam to open up and cut along each side to make a straight edge:
Step 11: Cut 3 strips long ways about an inch thick from sleeve. Place each upon each other and sew along short end (regular stitching is fine):
Step 12: Stretch each strand, allowing to roll on ends and then braid to opposite end. Sew end of strands to secure. Repeat with other sleeve. These will be the straps for the shirt. Attach to shirt and sew on.
I love my new shirt, I hope you have success with your own projects! Let me know how it goes. :)

Thursday, January 21, 2010

Another Reversable Halter Apron

My BF, Stefanie, recently joined me in my addiction of cake decorating...and that's when she realized she didn't have an apron to bake in! I gave her this for Christmas...these are so fun to make!

Halter Apron for Christmas

My Sissy has been wanting one of these aprons since I made my own a few months ago. I finally put one together for her for Christmas. She put it on right away after opening the present. Below you can see both sides of the apron (along with my neice, Gabbie :) ).

Monday, July 27, 2009

Reversable Halter Style Apron

I've been wanting to make an apron for long time but have been searching for the perfect pattern to do it with. I found it thanks to Tenth Muse Studios! You can check out the blog at http://www.tenthmusestudios.wordpress.com/. I simply loooove this pattern. It is a reversible apron styled like a halter dress to make you feel fun and flirty in the kitchen. I went straight for the heels the first time I put this on. My fiance can't wait for me to make dinner in this....in fact he just wants me to wear it all of the time. lol And so do I. :)
Here's the black with white polka dots side with red accents:

And here is the red with black with white polka dots accents side:

Halloween vest

My Nana had purchased this "pattern cloth" a while back from a craft store. She asked me to put it together for her because somehow how she got the idea that enjoy sewing and stuff (wink wink) and with delight, I accepted. I've never seen a pattern like this before where it's already on the material. Cool, huh:

After all of the cutting and pinning and stitching...

The vest finally came together in all its glory with plenty of time before the holiday...

Nana enjoyed it. Isn't she so cute?

My new logos

Hey y'all, it's been a little while since my last post but I've got plenty to update with. But first...my new logos are in! I absolutely love them! Simple for now and maybe when things start taking off big time I'll change it up, or not. :)

Sunday, July 12, 2009

Baby Cardinals jersey into a toddler tshirt

I received a request to convert another onzie into a todler t-shirt. This one specifically for the die hard Cardinals fan. May I make a suggestion to save you time should you try this at home...jersey material doesn't do well with sewing machines (some of your more experieced crafters may already have known that). Anyways, I learned my lesson but I was still able to get the same effect by sewing by hand. Success!

Wednesday, June 24, 2009

Fun and Funky T-Shirt Skirt

I took another stab at upcycling t-shirts into a skirt. I'm glad I did because I love mine. Although it's a little loud in colors, it's unique, which I love....oh, and VERY comfortable! Why do you think we wear t-shirts as casual wear? Because they're comfy, and if we can move comfy from above the waiste to below the waste, even better. :) Take a look into your closet for a couple of t-shirts you no longer wear and convert them into a cute A-line t-shirt skirt of your own using this tutorial.

Monday, June 8, 2009

Onsies into T-Shirts

Wouldn't it be great if our little ones could stay cute and tiny forever? Well that will never happen. They'll grow up and all of those precious clothes that you received at the baby shower just won't fit any more because the evergrowing kid is getting as tall as a bean stalk. So what to do with the clothes? Continue using them! And no, not as a rag. As more baby (toddler) clothes! Thanks to Tiny Decor for providing this tutorial for converting your child's onsies into toddler t-shirts. Anything to save you from buying more clothes (especially when the stuff you already have is in perfect shape) is deffinitely worth a try. I converted these for my nieces, and let me tell ya, the 20 minutes each that it took - well worth it.

Sunday, April 26, 2009

Recycled T-Shirt Skirt

What do you do with those t-shirts that seem to just pile up? Throw them away? Donate to thrift stores? Use as rags? Ever thought of recycling them to make a hot trendy skirt for the warmer weather? Well someone did! The weather is getting hot and what better way to get some sun on those legs than to reveal them? Click here to view the directions on how to make this cute and trendy A-line skirt. Only took me an hour to make this one and I plan on making more as soon as I gather more t-shirts. :)

Friday, March 20, 2009

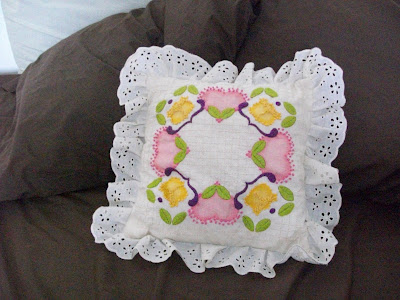
Heart Pillow

When decorating your home, why not add a personal touch instead of all of Martha Stewart's touch? Don't get me wrong, Martha has some good tastes, but it's your home...leave your own fingerprints. I created this dainty pillow from a kit that my mother gave me that is composed of embroidery and french knots and made by ME. Seeing this precious pillow on my couch is much more enjoyable than a purchased pillow could ever be.